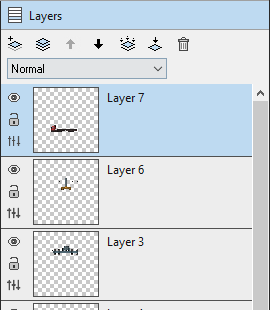
Layers
Lightcube art files contain one or more layers. The Layers window lists these layers with toolbar options to add, modify, move or delete them. A layer is inherently transparent and can overlay other layers and you can set the transparency level of any layer in order to blend pixels. There is always an active layer and all tools operate on the active layer.
A layer can be locked so that no editing can take place, it can also be marked as a reference layer that contains a reference image and no editing is allowed on a reference layer either. Layers can also be hidden. Reference and hidden layers are excluded from the exported image.
At the top of the layer list you will notice a row of buttons:
| Button | Description |
|---|---|
 |
Add a new layer |
 |
Duplicate the selected layer |
 |
Move the selected layer up |
 |
Move the selected layer down |
 |
Merge the selected layer down |
 |
Flatten all layers into one layer, reference and hidden layers are discard. |
 |
Delete the selected layer |
In addition to these toolbar buttons, there is a layer blending mode selection dropdown, this list of blending modes changes how the layer is blended into the layer below it. For more information on blending modes, see the Layer Blending Modes section.
Each layer has a three buttons that enable you to toggle the layer visibility, toggle the lock status of the layer and edit the layer properties.
| Button | Description |
|---|---|
 |
Toggle layer visibility |
 |
Toggle layer lock |
 |
Edit layer properties |
If you click the Edit Properties button (or double click on the layer row), the following dialog window appears:
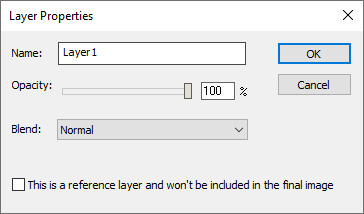
Changes made in this window are reflected in realtime in the layer that you have selected, for example, changing the blending mode is immediately visible in the layer, however the change is only temporary. If you click the OK button, the changes become permanent.